Purpose
- Maintain airway patency by removing mucus and encrusted secretions.
- Promote cleanliness and prevent infection and skin breakdown at stoma site.
Assessment
- Assess for excess peristomal secretions, excess intra-tracheal secretions, or soiled tracheostomy dressing and ties.
- Assess respiratory status: breath sounds, respiratory rate, skin color, labored breathing, flared nares or sternal retractions, arterial blood gases.
- Identify factors that influence tracheostomy care:
- Inadequate nutritional status predisposes client to infection, poor healing, and weak cough reflex.
- Respiratory infection: pulmonary secretions increase in amount. Note color, amount, and odor.
- Fluid status: inadequate hydration increases tenaciousness of secretions. Client may have difficulty coughing up thick secretions.
- Humidity: tracheostomy collars deliver humidified air to prevent dry, cracked membranes and thickened secretions.
- Identify type of tracheostomy tube used and if inner cannula is present. Identify if tracheostomy tube is cuffed and if the cuff is inflated.
- Assess client's ability to understand and perform independent tracheostomy care.
Equipment
- Sterile tracheostomy care kit containing:
- - Two basins
- - Small brush or pipe cleaners
- - 4" × 4" gauze
- - Commercially available tracheostomy dressing
- - Twill tape or tracheostomy ties
- Hydrogen peroxide
- Normal saline
- Sterile gloves
- Scissors
- Tracheostomy suction supplies
Procedure
-
Verify the physician order and identify the client.
Rationale: Prevents potential errors.
-
Wash your hands and don gloves.
Rationale: Handwashing and gloves reduce transmission of microorganisms.
-
Explain procedure to client. Place the client in semi- to high Fowler's position (Fig. 1).
Rationale: Teaching decreases client anxiety and increases compliance.
-
Suction tracheostomy tube. Before discarding gloves, remove soiled tracheostomy dressing and discard with catheter inside glove. When suctioning through a tracheostomy tube, insert catheter about 10 to 12 cm (in an adult).
Rationale: Removing secretions maintains a patent airway while doing tracheostomy cleaning.
-
Replace oxygen or humidification source and encourage client to deep-breathe as you prepare sterile supplies. Do not snap in place.
Rationale: Maintain good oxygenation status. Promotes easy removal prior to sterile procedure.
-
Open sterile tracheostomy kit (Fig. 2). Pour normal saline into one basin, hydrogen peroxide into the second (Fig. 3). Don Sterile gloves (Fig. 4). Open several sterile cotton-tipped applicators and one sterile precut tracheostomy dressing and place on sterile field (Fig. 5). If kit does not contain tracheostomy ties, cut two 15-inch pieces of twill tape and set aside.
Rationale: Preparing equipment allows for smooth, organized performance of tracheostomy care.
-
Remove oxygen source (Fig. 6). The hand that touches the oxygen source is no longer sterile. Note: For trache ostomy tube with inner cannula, complete Steps 7 to 25. For tracheostomy tube without inner cannula or plugged with a button, complete Steps 14 to 25.
Rationale: Prevents contamination of sterile gloves.
- Unlock inner cannula by turning counterclockwise. Remove inner cannula (Fig. 7).
-
Place inner cannula in basin with hydrogen peroxide (Fig. 8).
Rationale: Hydrogen peroxide loosens and removes secretions from inner cannula.
-
Replace oxygen source over or near outer cannula.
Rationale: Maintain a constant supply of oxygen to prevent respiratory or cardiac distress. Note: Not all clients require a constant oxygen supply during tracheostomy care.
-
Clean lumen and sides of inner cannula using pipe cleaners or sterile brush (Fig. 9).
Rationale: Mechanical force and friction are needed to remove thick or dried secretions.
-
Rinse inner cannula thoroughly by agitating in normal saline for several seconds (Fig. 10).
Rationale: Rinsing and agitation remove secretions and water from cannula and provide lubrication for easy reinsertion.
-
Remove oxygen source and replace inner cannula into outer cannula. "Lock" by turning clockwise until the two blue dots align (Fig. 11). Replace oxygen or humidity source.
Rationale: Oxygen is reestablished to a secured inner cannula.
- Remove tracheostomy dressing from under faceplate (Fig. 12).
-
Clean stoma under faceplate with circular motion using hydrogen peroxide-soaked cotton applicators. Clean dried secretions from all exposed outer cannula surfaces (Fig. 13).
Rationale: Dried secretions are a good medium for bacterial growth.
-
Remove foaming secretions using normal saline-soaked, cotton-tipped applicators.
Rationale: Hydrogen peroxide can be irritating to the skin.
-
Pat moist surfaces dry with 4" × 4" gauze.
Rationale: Moist surfaces support growth of microorganisms and skin excoriation.
-
Place dry, sterile, precut tracheostomy dressing around tracheostomy stoma and under faceplate (Fig. 14). Do not use cut 4" × 4" gauze.
Rationale: Frayed cotton fibers from cut gauze could be aspirated into the trachea.
-
If tracheostomy ties are to be changed, have an assistant don a sterile glove and hold the tracheostomy tube in place.
Rationale: This action prevents accidental displacement of the tracheostomy tube if the client moves or coughs when the ties are not secure.

Fig. 1: Greet client and explain procedure.

Fig. 2: Open sterile tracheostomy kit.
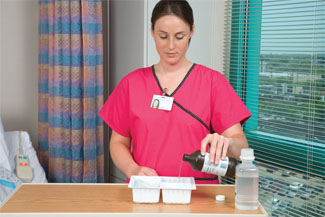
Fig. 3: Pour sterile hydrogen peroxide into basin.

Fig. 4: Don sterile gloves.
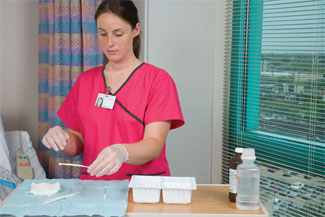
Fig. 5: Place items on sterile field.

Fig. 6: Remove oxygen source.
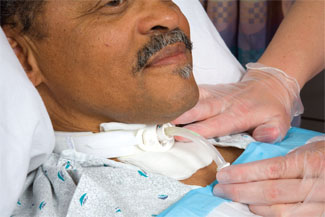
Fig. 7: Unlock inner cannula by turning counter-clockwise.

Fig. 8: Place inner cannula into basin with hydrogen peroxide.

Fig. 9: Clean inner cannula with brush.
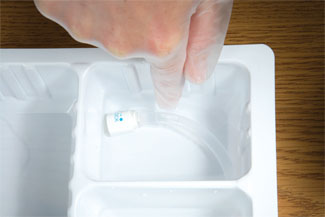
Fig. 10: Rinse inner cannula in normal saline.

Fig. 11: Replace inner cannula, then lock into place.

Fig. 12: Remove soiled tracheostomy dressing.

Fig. 13: Clean secretions from tracheostomy site with cotton applicator.
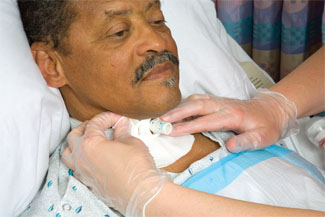
Fig. 14: Replace new precut tracheostomy dressing.
For Tracheostomy Ties, Follow Steps 20-24
- Cut a 12-inch slit approximately 1 inch from one end of both clean tracheostomy ties. This is easily done by folding back on itself 1 inch of the tie and cutting a small slit in the middle.
- Remove and discard soiled tracheostomy ties.
-
Thread end of tie through cut slit in tie. Pull tight.
Rationale: The tie is secured to the faceplate without using knots. Knots are difficult to undo when ties become crusted with secretions.
- Repeat Step 21 with the second tie.
-
Bring both ties together at one side of the client's neck. Assess that ties are only tight enough to allow one finger between tie and neck. Use two square knots to secure the ties. Trim excess tie length. Note: Assess tautness of tracheostomy ties frequently in clients whose neck may swell from trauma or surgery.
Rationale: Ties must be taut enough to prevent accidental dislodging of tracheostomy tube but loose enough not to cause choking or pressure on the jugular veins. Ties at side of neck are more comfortable for the client.
For Tracheostomy Collar, Follow Steps 25-27.
- While an assisting nurse holds the faceplate, gently pull the Velcro tab and remove the collar on one side. Insert the new collar into the opening on the faceplate and secure the Velcro tab. (Figs. 15 and 16).
- Hold faceplate in place as the assisting nurse repeats step on the second side (Fig. 17).
- Remove the old collar and ensure that the new collar is securely in place (Fig. 18).
-
Remove gloves and discard disposable equipment. Label with date and time, and store reusable supplies.
Rationale: Opened normal saline is considered sterile for 24 hours.
-
Assist client to comfortable position and offer oral hygiene.
Rationale: Promotes client comfort.
-
Wash your hands.
Rationale: Maintains infection control and communicates with other healthcare team members.

Fig. 15: Insert new collar into opening on faceplate.
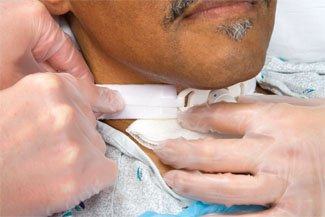
Fig. 16: Secure Velcro tab.

Fig. 17: Insert new collar on second side and secure Velcro tab.

Fig. 18: Discard soiled collar, ensure new collar is securely in place.
| Sample Documentation | |||
| 12/05/10 | 0900 |
P: Impaired airway clearance. I: Trach care - large amount of thick secretions cleansed from inner cannula, skin around trach is intact but slightly red. Client is able to expectorate secretions when encouraged to do so. Mist collar in place to maintain humidification. E: Increase fluids and encourage pulmonary hygiene and mobility to decreased pooling of secretions. S. Roberts, RN |
|
Lifespan Considerations
Infant and Child- Additional assistants may be necessary during tracheostomy care to prevent active children from dislodging or expelling their tracheostomy tubes.
- Encourage parents to participate with the procedure in an effort to comfort the child and promote client teaching.
Home Care Modifications
-
Teach the client or caregiver the following:
- Handwashing is the most important step before touching the tracheostomy.
- The function of each part of the tracheostomy tube.
- To remove, change, and replace the inner cannula.
- To clean the inner cannula two or three times a day.
- To clean the tracheostomy stoma.
- To suction tracheal secretions.
- To assess for symptoms of infection (i.e., increased temperature, increased amount of secretions, change in color or odor of secretions).
- To use a mirror for better visualization.
- Encourage parents to participate with the procedure in an effort to comfort the child and promote client teaching.