Purpose
- The tracheal cuff must exert enough pressure on the tracheal wall to seal the airway without compromising the blood supply to the tracheal mucosa. To keep pressure within safe limits, minimal occlusive volume is measured.
Assessment
- Assess your facility's policy regarding tracheal cuff care.
- Assess for the size of the cuff and maximum cuff inflation pressure.
- Assess breath sounds, respiratory rate, and character.
Equipment
- Cuff pressure manometer
- Stethoscope
- Suction equipment
- Gloves
Procedure
- Gather all equipment.
-
Wash your hands.
Rationale: Handwashing reduces transfer of microorganisms.
-
Explain the procedure to the client and provide privacy.
Rationale: Explanation protects client's rights and encourages participation in care. Measure cuff pressure at least every 8 hours to avoid overinflation.
-
Put on gloves and suction the ET or tracheostomy tube and the client's oropharynx according to facility policy and using sterile technique when appropriate.
Rationale: Removes accumulated secretions above the cuff.
-
Attach the cuff pressure manometer to the pilot balloon port.
Rationale: Ideal pressure (known as minimal occlusive volume) is lowest amount needed to seal airway. Many authorities recommend maintaining a cuff pressure lower than venous perfusion pressure-usually about 20 to 25 cm H2O. (More than 25 cm H2O may exceed venous perfusion pressure.) Actual cuff pressure will vary with each client. Keep connection between measuring device and pilot balloon port tight to avoid an air leak that could compromise cuff pressure.
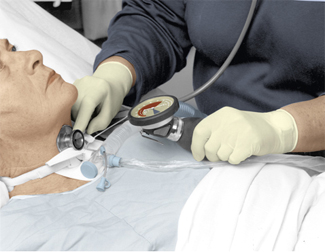
- Place the diaphragm of the stethoscope over the trachea and listen for an air leak (Fig. 1). Keep in mind that a smooth, hollow sound indicates a sealed airway; a loud, gurgling sound indicates an air leak.
- If you do not hear an air leak, press the red button under the dial of the cuff pressure manometer to slowly release air from the balloon on the tracheal tube (Fig. 2). Auscultate for an air leak.
- As soon as you hear an air leak, release the red button and gently squeeze the handle of the cuff pressure manometer to inflate the cuff (Fig. 3). Continue to add air to the cuff until you no longer hear an air leak.
-
When the air leak ceases, read the dial on the cuff pressure manometer (Fig. 4). This measurement is the minimal pressure required to effectively occlude the trachea around the tracheal tube. In many cases, this pressure will fall within the green area (20 to 25 cm H2O) on the manometer dial.
Rationale: Some clients require less pressure, whereas others (eg, those with tracheal malacia [an abnormal softening of the tracheal tissue])require more pressure. Maintaining cuff pressure at lowest possible level will minimize cuff-related problems.
- Disconnect the cuff pressure manometer from the pilot balloon port. Document the pressure value.
- After cuff pressure measurement, record the date and time of the procedure, cuff pressure, any complications, the nursing actions taken, and the client's tolerance of the procedure.

Fig. 1: Place the diaphragm of the stethoscope over the trachea.

Fig. 2: Release air from the balloon on the tracheal tube.

Fig. 3: Inflate the cuff of the pressure manometer.

Fig. 4: When the air leak ceases, read the dial on the cuff pressure
manometer.
| Sample Documentation | |||
| 06/29/10 | 2200 | Oropharynx suctioned for thin clear secretions. Tracheal tube cuff pressure checked, cuff deflated and reinflated with a minimum occlusive pressure of 22 cm H2O. Client in semi-Fowler's position, respirations are even and unlabored after the procedure. Natalie Conway, RN | |
Collaboration and Delegation
- Respiratory therapy personnel will often measure the endotracheal and tracheal cuff pressures. Management of the cuff pressure can not be delegated to unlicensed assistive personnel.