Purpose
- Remove excess mucous secretions to maintain patent airway.
- Collect sputum or secretions for diagnostic testing.
Assessment
- Assess respiratory system:
- Note rate, depth, rhythm of respirations.
- Note noisy, wet, or gurgling respirations.
- Auscultate breath sounds.
- Assess client's ability to cough. Note amount and character of sputum.
- Assess vital signs. Compare to baseline vital signs. Note an elevation in temperature.
- Assess level of consciousness and ability to protect airway (i.e., presence of cough reflex). Note any drainage from mouth.
Equipment
- Sterile suction kit containing:
- Appropriate-sized catheter: infants, 5 to 8 Fr; children, 8 to 10 Fr; adults, 12 to 18 Fr
- Pair of gloves
- Container for saline to flush and lubricate catheter
- Sterile saline (may be provided in kit)
- Water-resistant disposal bag
- Facial tissues
- Towel (optional)
Procedure
-
Verify the physician order and identify the client.
Rationale: Prevents potential errors.
-
Wash your hands.
Rationale: Handwashing prevents transmission of microorganisms.
-
Explain procedure and purpose to client.
Rationale: Explanations reduce anxiety and encourage cooperation with procedure.
-
Position the client.
-
Position the conscious client with an intact gag reflex in a semi-Fowler's position.
Rationale: The semi-Fowler's position helps prevent aspiration of secretions.
-
Position the unconscious client in a side-lying position facing you.
Rationale: A side-lying position facilitates drainage of secretions by gravity and prevents aspiration.
-
Position the conscious client with an intact gag reflex in a semi-Fowler's position.
-
Turn on suction device and adjust pressure: infants and children, 50 to 75 mm Hg; adults, 100 to 120 mm Hg (Fig. 1).
Rationale: Excessive negative pressure traumatizes mucosa and can induce hypoxia.
-
Open and prepare sterile suction catheter kit (Fig. 2).
Rationale: Tube occlusion tests suction apparatus; higher pressures cause excessive trauma without enhancing secretion removal.
- Unfold sterile cup, touching only the outside. Place on bedside table.
- Pour sterile saline into cup.
-
Preoxygenate client with 100% oxygen. Hyperinflate with manual resuscitation bag (Fig. 3).
Rationale: Preoxygenation helps prevent hypoxia; hyperinflation decreases atelectasis caused by suctioning.
-
Don sterile gloves. If kit provides only one glove, place on dominant hand.
Rationale: Dominant hand will remain sterile. You may use a clean disposable glove on the nondominant hand to protect yourself from exposure to mucous membranes and sputum.
- Pick up catheter with dominant hand. Pick up connecting tubing with nondominant hand. The nondominant hand is now considered clean rather than sterile. Attach catheter to tubing without contaminating sterile hand (Fig. 4).
-
Place catheter end into cup of saline. Test functioning of equipment by applying thumb from nondominant hand over open port to create suction (Fig. 5).
Rationale: Lubrication makes catheter insertion easier and ensures proper functioning of suction equipment.
-
Insert catheter into trachea through artificial airway during inspiration (Fig. 6).
Rationale: Inspiration opens epiglottis and facilitates catheter the side of the mouth prevents stimulation of the gag reflex.
-
Advance catheter until you feel resistance. Retract catheter 1 cm before applying suction. Note: Client usually will cough when catheter enters trachea.
Rationale: Retracting catheter slightly prevents mucosal damage.
-
Apply suction by placing thumb of nondominant hand over open port. Rotate the catheter with your dominant hand as you withdraw the catheter. This should take 5 to 10 seconds (Fig. 7)
Rationale: Rotation of catheter prevents trauma to mucous membrane from prolonged suctioning of one area. Limiting the suction time to 10 seconds or less prevents hypoxia.
-
Hyperoxygenate and hyperinflate using manual resuscitation bag for a full minute between subsequent suction passes. Encourage deep breathing.
Rationale: Prolonged suctioning can induce hypoxia.
-
Rinse catheter and tubing by suctioning saline through.
Rationale: Rinsing clears secretions from catheter.
- Repeat Steps 10 to 14 until airway is clear, limiting each suctioning to three passes.
-
Without applying suction, insert the catheter gently along one side of the mouth. Advance to the oropharynx.
Rationale: Suction the oropharynx after trachea because the mouth is less clean than the trachea. Directing the catheter along the side of the mouth prevents stimulation of the gag reflex.
-
Apply suction for 5 to 10 seconds as you rotate and withdraw catheter.
Rationale: Rotation of the catheter prevents trauma to the mucous membrane. Be sure to remove secretions that pool beneath the tongue and in the vestibule of the mouth.
- Allow 1 to 2 minutes between passes for the client to ventilate. Encourage deep breathing. Replace oxygen if applicable.
- Repeat Steps 16 and 17 as necessary to clear oropharynx.
- Rinse catheter and tubing by suctioning saline through.
-
Remove gloves by holding catheter with dominant hand and pulling glove off inside-out. Catheter will remain coiled inside the glove. Pull other glove off inside-out (Fig. 8). Dispose of in trash receptacle.
Rationale: Contain client secretions inside gloves to reduce transmission of microorganisms.
- Turn off suction device.
-
Assist client to comfortable position. Offer assistance with oral and nasal hygiene. Replace oxygen device if used.
Rationale: Accumulated respiratory secretions irritate the mucous membranes and are unpleasant for the client.
- Dispose of disposable supplies.
- Wash your hands.
-
Ensure that sterile suction kit is available at head of bed.
Rationale: Provides immediate access to suction equipment when needed.
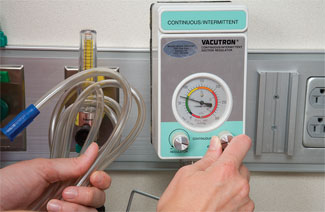
Fig. 1: Adjust suction to appropriate pressure.
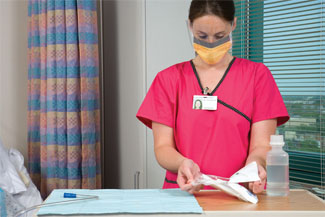
Fig. 2: Open and prepare sterile suction catheter kit.
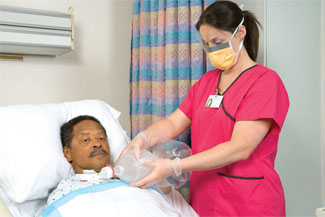
Fig. 3: Preoxygenate and hyperinflate before suction.
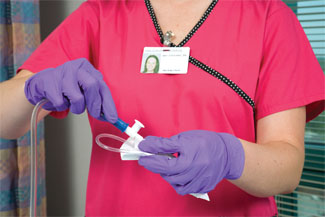
Fig. 4: Attach catheter to suction tubing./p>

Fig. 5: Flush saline through catheter, occluding Y-port to test suction.

Fig. 6: Insert catheter into trachea without applying suction.

Fig. 7: Apply suction as you withdraw catheter.
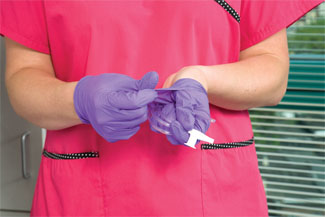
Fig. 8: Remove glove, pulling it over the catheter in other hand.
| Sample Documentation | |||
| 11/20/10 | 1500 |
P: Impaired airway clearance. I: Suctioned X3 with pre-oxygenation, encouraged client to deep breathe, cough, and increase fluid intake, mist collar on room air in place, O2 sats remain above 92%. E: Copious thick secretions obtained, will need assessing resuctioning every 2 hours as cough is weak and secretions copious. S. Roberts, RN |
|
Lifespan Considerations
Infant and Child- Infants and young children have airways that are easily occluded by a small amount of secretions. The nasal airway is smaller in diameter, the epiglottis is higher, and the tongue is proportionately larger.
- A bulb syringe is often used to aspirate secretions from an infant's nasal and oral cavities. This procedure is clean, rather than sterile, because the trachea is not entered.
Home Care Considerations
- Clients may need to learn to suction their secretions if they have difficulty coughing them effectively. Maintaining adequate hydration thins secretions and facilitates their removal.
- The type and number of microorganisms available to contaminate the respiratory system are different at home than in the acute care setting. Teach the client or caregiver to use plain paper cups for suctioning, not a sterile basin. Keep the cups in a sealable package. The client or caregiver should remove a clean cup from the bottom of the package for each suctioning effort and reseal the package between uses.
- Suction catheters can be clean, not sterile. They should be washed in soapy water, rinsed well, and soaked in a vinegar-and-water solution.
- To decrease expense, saline solution can be made by boiling water and adding salt.
Collaboration and Delegation
- Respiratory therapists frequently suction clients in the acute care setting. Nurses need to maintain skill in suctioning so that suctioning can occur quickly to maintain a patent airway if a respritory therapist is unavailable.