Purpose
- Monitor arterial oxygen saturation (SaO2) noninvasively.
- Detect clinical hypoxemia promptly.
- Assess client's tolerance to tapering of oxygen therapy or activity.
Assessment
- Identify clients at risk for hypoxemia (i.e., respiratory and cardiac disease) who would benefit from pulse oximetry.
- Identify indications for continuous or intermittent oximetry monitoring.
- Assess client's baseline respiratory status including vital signs, skin and nailbed color, breath sounds, dyspnea, alterations in breathing patterns, current oxygen supplementation, presence of dysrhythmias, and tissue perfusion of extremities.
- Review laboratory hemoglobin values to identify anemic clients whose oxygen content in the blood may be low although their SaO2 is within normal levels.
- To choose appropriate sensor, observe client's height, weight, and size, and note any allergies to adhesive.
Equipment
- Pulse oximeter
- Nail polish remover, if needed
Procedure
-
Select appropriate type of sensor. A wide variety of sensors are available in sizes for neonates, infants, children, and adults. In addition, there are clip-on, adhesive, and disposable sensors. To select the appropriate sensor, consider the client's weight, activity level, if infection control is a concern, tape allergies, and anticipated duration of monitoring.
Rationale: Proper sensor will increase accuracy of reading.
-
Explain purpose of procedure to client and family.
Rationale: Understanding the procedure increases compliance and prevents anxiety.
-
Instruct client to breathe normally.
Rationale: Consistent breathing prevents large fluctuations in minute ventilation and inaccurate reflections of SaO2 levels.
-
Select appropriate site to place sensor. (Fig. 1) Avoid using lower extremities that may have compromised circulation, or extremities receiving infusions or other invasive monitoring. If client has poor tissue perfusion due to peripheral vascular disease or is receiving vasoconstrictor medications, a nasal sensor or forehead sensor may be considered.
Rationale: Decreased circulation can falsely alter the SaO2 measurements from the pulse oximeter.
-
Remove nail polish or acrylic nail from digit to be used.
Rationale: Some nail polish (dark colors) and artificial nails can interfere with accurate measurements.
-
Attach sensor probe (Fig. 2) and connect it to the pulse oximeter (Fig. 3). Make sure the photosensors are accurately aligned (Fig. 4).
Rationale: Proper alignment is essential for accurate SaO2 measurement.
-
Watch for pulse-sensing bar on face of oximeter to fluctuate with each pulsation and reflect pulse strength. Double-check machine pulsations with client's radial or apical pulse (Fig. 5).
Rationale: A weak signal or missed pulsations will not produce an accurate measurement.
-
If continuous pulse oximetry is desired, set the alarm limits on the monitor to reflect the high and low oxygen saturation and pulse rates. Ensure that the alarms are audible before leaving the client. Inspect the sensor site every 4 hours for tissue irritation or pressure from the sensor.
Rationale: Ensure client safety by prompt detection of low critical oxygen saturation values or tissue irritation.
-
Read saturation on monitor and document as appropriate with all relevant information on client's chart (Fig. 6). Report SaO2 less than 93% to physician.
Rationale: Documentation provides healthcare team with baseline information and response to therapy. SaO2 of less than 93% usually indicates need for increased supplemental oxygen.

Fig. 1: Select appropriate site with good tissue perfusion.

Fig. 2: Attach sensor probe.

Fig. 3: Connect sensor probe to pulse oximeter.
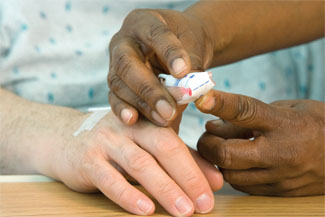
Fig. 4: Check proper alignment of photosensors.

Fig. 5: Select appropriate site with good tissue perfusion.
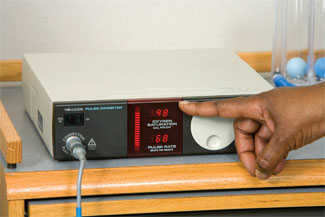
Fig. 6: Read oxygen saturation from machine.
| Sample Documentation | |||
| 12/12/10 | 1400 | O2 sat 93% on 2 L/m via cannula while resting in bed, O2 sat decreased to 88% when ambulated to the bathroom, RR increased to 26, MD notified and client returned to bed. O2 sat up to 93% when returned to bed and oxygen given at 2 L/m. Oxygen required during ambulation to prevent desaturation. S. Roberts, RN | |
Lifespan Considerations
Infant and Child- Use a sensor that is appropriate for the client's weight and size.
- Young children may express fear of being burned or hurt by the light on the sensor. Show the sensor to the child or place it on Mom or Dad's finger before placing it on the child.
- Clients who have peripheral vascular disease or who smoke cigarettes or use nicotine gum may have reduced tissue perfusion. This can make monitoring difficult and interfere with the accuracy of the readings.
Home Care Modifications
- Because they are portable, pulse oximeters may be used in home care to monitor oxygen therapy. When intermittent monitoring is needed, the home nurse may assess pulse oximetry on each visit.
Collaboration and Delegation
- Consult a respiratory therapist to develop a plan for the client with O2 saturations below 93%. Frequently, respiratory therapists will titrate oxygen levels as needed. When oxygen flow is adjusted, oxygen saturation reading is obtained after 30 minutes to evaluate the client's response.
- When delegating O2 saturation monitoring to unlicensed nursing personnel, tell them to promptly report any values less than 93%. Validate any unusual values obtained.