Purpose
- Monitor respiratory status of a patient with a chest tube.
- Ensure chest drainage system is functioning adequately to promote lung expansion.
Assessment
- Assess respiratory status (i.e., watch symmetrical expansion of thoracic cage; auscultate breath sounds; assess quality, depth, and rate of breaths, pulse oximetry).
- Assess for clinical signs and symptoms of hypoxia: anxiety, decreased levels of consciousness, inability to concentrate, fatigue, dizziness, cardiac dysrhythmias, pallor or cyanosis, dyspnea. Notify physician immediately of any significant changes in patient's respiratory status.
Equipment
- Occlusive sterile dressing (if needed).
- Chest tube
- Chest tube drainage system
Procedure
-
Confirm physician's order including amount of suction.
Rationale: Prevents potential errors.
-
Assist client to semi- or high Fowler's position.
Rationale: These positions assist with optimal lung expansion.
-
Assess insertion site of chest tube. Note and document amount and color of drainage on dressing around insertion site. Feel insertion site for crepitus-air leaking into the subcutaneous tissue (Fig. 1). Document any crepitus found. Reinforce insertion dressing as needed.
Rationale: Excessive drainage around the insertion site can indicate bleeding. The insertion site dressing may need to be changed by the surgeon who inserted the chest tube. Development of crepitus can indicate a small air leak into the subcutaneous tissue. Crepitus may indicate a need for the surgeon to adjust the chest tube placement.
-
Assess status of chest tubing. Be sure tubing remains at the level of the client and no dependent loops are present. Assess that there are no visible clots in the tubing. You may gently "milk" (compress tubing with fingers) the clots to encourage movement into the drainage system, but you never want to strip chest tubing.
Rationale: Dependent loops of tubing may collect fluid and prevent drainage of fluid from the chest cavity. Stripping chest tubing can create dangerous intrathoracic negative pressure, injuring the client.
-
Assess the drainage collection chamber. (Fig. 2) Be sure to keep chest drainage system upright. Assess for amount, color, and character of drainage. Mark the collection chamber to accurately reflect the amount of drainage accumulated during your shift (Fig. 3). Note any significant increase in the amount of drainage.
Rationale: Keeping the drainage system upright will maintain a water seal and ensure proper sequential filling of the collection chambers. Marking the collection chamber at the end of each shift will allow evaluation of output to detect excessive bleeding or healing.
-
Assess suction chamber. Make sure the water level in the suction chamber is at the prescribed amount of suction and that it is connected to the wall suction that is turned on to continuous suction (Fig. 4). Usually the suction is set at 10 to 20 mm Hg.
Rationale: The amount of suction is determined by the water level in the suction chamber rather than the suction setting on the wall unit. Gentle bubbling is normal in the suction chamber.
-
Assess the system for any air leaks. Check all external connections (i.e., the chest tube's connection to the drainage system, the suction tubing's connection to the drainage system). Examine the water seal chamber as the client breathes normally and as he or she coughs.
Rationale: A chest drainage system needs to be a continuously closed system to maintain the negative pressure necessary for normal respiratory function. Any air leak interrupts this closed system. Bubbling in the water seal chamber may indicate an intermittent or continuous air leak. Bubbling when a client coughs indicates an intermittent air leak. Ongoing bubbling in the water seal chamber indicates a continuous air leak. New air leaks need to be reported to the physician.
-
Encourage the client to cough, deep breathe, and use an incentive spirometer frequently. Provide analgesics as necessary.
Rationale: Coughing and deep breathing will increase intrapleural pressure, facilitating fluid drainage from the pleural space and enhancing lung expansion. Analgesics will assist with pain control as the client coughs, deep breathes, and uses an incentive spirometer.
-
Clamping chest tubes is no longer recommended.
Rationale: Clamping can result in sudden accumulation of air in the pleural space, which can cause a tension pneumothorax, resulting in tension on the heart and great vessels that can be life threatening.
-
If the chest tube becomes expelled, do not leave the client. Cover the opening where the chest tube had been inserted with the sterile 4' × 4' gauze, and keep direct pressure on the site. Send a colleague to call the physician immediately.
Rationale: Leaving the chest tube insertion site open will create an open pneumothorax and can result in respiratory distress. A physician will need to replace the chest tube as soon as possible.
-
Document chest tube drainage, chest tube patency, presence of an air leak, amount of suction, pain level, dressing status, and respiratory status.
Rationale: Documenting maintains legal record and communicates with health team members.

Fig. 1: Palpate insertion site of chest tube.

Fig. 2: Assess drainage collection chamber.
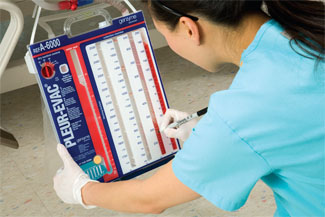
Fig. 3: Mark collection chamber.

Fig. 4: Assess water level in suction chamber.
| Sample Documentation | |||
| 10/18/10 | 2300 | CT to 20 mm Hg pressure, minimal drainage and no air leak. Anticipate CT removal in the am. S. Roberts, RN | |
Collaboration and Delegation
- Notify the physician immediately if the chest tube dislodges, a sudden air leak occurs, significant unexpected drainage occurs, or if the client is experiencing dyspnea. Caution all personnel to maintain upright position of the chest tube drainage system and to keep it stable, often hooked to the bed. Take care that system does not get under the bed where it could be accidentally cracked if the bed position were lowered.