Purpose
- To assess cardiac function, to evaluate venous return to the heart, and to indirectly gauge how well the heart is pumping.
- To gain access to a large vessel for rapid, high-volume fluid administration and to facilitate frequent blood withdrawal for laboratory samples.
Assessment
- Assess physician's order, client's medications, and treatments.
- Asses for all pertinent allergies.
- Assess CV site for signs of erythema, pain, tenderness, and edema.
- Assess for any conditions that may alter venous return, circulating blood volume, or cardiac performance.
Equipment
- Disposable CVP manometer set
- Leveling device (such as rod from reusable CVP pole holder or carpenter's level or rule)
- Additional stopcock (to attach CVP manometer to catheter)
- Antiseptic pad
- Extension tubing, if needed
- IV pole
- IV solution (usually normal saline)
- IV drip chamber and tubing
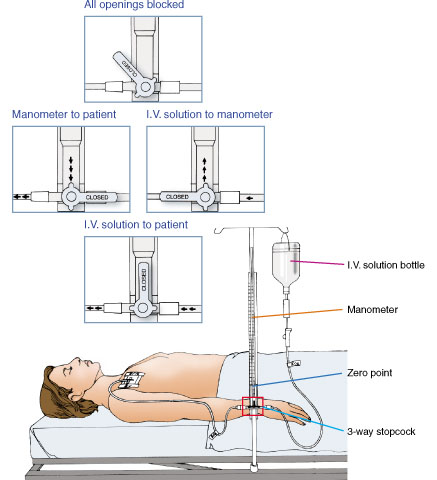
Fig 1: A water manometer setup.
Procedure
- Gather the necessary equipment.
-
Confirm the client's ID using two client identifiers according to your facility's policy. Do not start the treatment if the client is not wearing an ID bracelet.
Rationale: Checking identification ensures client safety through concept of correct procedure for correct client.
-
Provide privacy and explain the procedure to the client.
Rationale: Explanation protects client's rights and reduces anxiety.
-
Wash your hands and don gloves.
Rationale: Handwashing and gloves reduce transfer of microorganisms.
-
Connect the IV tubing to the manometer. Prime the IV tubing and manometer setup. Ensure all air bubbles are removed from tubing. Attach the water manometer to an IV pole.
Rationale: Bubbles can alter CVP readings.
-
Swab the injection port with an antiseptic. Allow the injection port to dry.
Rationale: Antiseptic prevents introduction of microorganisms during flushing.
- Connect the IV tubing to the CV line. Change the IV solution every 24 hours and the IV tubing every 96 hours, according to your facility's policy. Label the IV solution, tubing, and dressing with the date, time, and your initials.
-
With the CV line in place, position the client flat, with the bed in its lowest position. The CVP reflects right atrial pressure; you must align the right atrium (the zero reference point) with the zero mark on the manometer. To find the right atrium, locate the fourth intercostal space at the midaxillary line. Mark the appropriate place on the client's chest. Align the base of the manometer with the zero reference point by using a leveling device and secure it in place.
Rationale: Marking client's chest ensures all subsequent recordings will be made using same location.
-
If the client cannot tolerate a flat position, place the client in the semi-Fowler's position. When the head of the bed is elevated, the phlebostatic axis remains constant but the midaxillary line changes.
Rationale: Each time client changes position, positioning of manometer will need to be readjusted to zero reference point.
- Typically, markings on the manometer range from -2 to 38 cm H2O. However, manufacturer's markings may differ. Read the directions before setting up the manometer and obtaining readings.
-
Turn the stopcock off to the client and slowly fill the manometer with IV solution until the fluid level is 10- to 20-cm H2O higher than the client's expected CVP value. Do not overfill the tube.
Rationale: If tube is overfilled, fluid that spills over top can become a source of contamination.
-
Turn the stopcock off to the IV solution and open to the client. The fluid level in the manometer will drop. When the fluid level comes to a rest, it will fluctuate slightly with respirations.
Rationale: Fluid will drop during inspiration and rise during expiration.
- Record CVP at the end of expiration, when intrathoracic pressure has a negligible effect and the fluctuation is at its highest point. Depending on the type of water manometer used, note the value at the bottom of the meniscus or at the midline of the small floating ball.
- After obtaining the CVP value, turn the stopcock to resume the IV infusion, if indicated.
-
Confirm the stopcock is turned so that the IV solution port, CVP column port, and client port are open. Be aware that, with this stopcock position, infusion of the IV solution increases CVP. Therefore, expect higher readings than those taken with the stopcock turned off to the IV solution.
Rationale: Initial CVP reading with IV solution infusing at a constant rate will be higher. Assess client closely for changes because CVP will change as client's condition changes, even though initial reading was higher.
-
After the initial CVP reading, reevaluate readings frequently to establish a baseline for the client. Authorities recommend obtaining readings at 15-, 30-, and 60-minute intervals to establish a baseline. If the client's CVP fluctuates by more than 2 cm H2O, suspect a change in clinical status and report this finding to the physician.
Rationale: Contacting physician facilitates intervention for client.
- Place the client in a comfortable position.
-
Remove the gloves and wash your hands.
Rationale: Handwashing reduces transfer of microorganisms.
- Document the CVP reading on the flow sheet. Note the condition of the catheter insertion site. Note any complications and actions taken.
| Sample Documentation | ||
| 03/12/10 | 1700 |
CVP reading taken from left subclavian triple lumen catheter, see flow sheet. No redness or swelling noted at the insertion site, dressing is clean, dry, and intact. IV fluids continue to infuse, as ordered.
Natalie Conway, RN |
Collaboration and Delegation
- As ordered, arrange for chest X-rays after insertion and daily to check catheter placement. The X-ray after initial placement is also used to assess for a pneumothorax, a complication from insertion.
- Procedures related to a CV line are not delegated to unlicensed assistive personnel.