Purpose
- To remove secretions from the pharynx by a suction catheter inserted through the nostril.
Assessment
- Assess your facility's policy to determine whether a physician's order is required for oropharyngeal suctioning.
- Assess the client's blood gas or oxygen saturation values and check vital signs.
- Assess the client's ability to cough and deep breathe to determine the ability to move secretions up the tracheobronchial tree.
- Assess the client's history for a deviated septum, nasal polyps, nasal obstruction, traumatic injury, epistaxis, or mucosal swelling.
Equipment
- Wall suction or portable suction unit
- Connecting tubing
- Sterile normal saline solution
- Disposable sterile container
- Sterile suction catheter (#10 to #16 French for an adult)
- Sterile gloves
- Clean gloves
- Goggles
- Nasopharyngeal or oropharyngeal airway (optional for frequent suctioning)
- Overbed table
- Waterproof trash bag
- Towel
- Optional: tongue blade, tonsil tip suction device
Note: A commercially prepared kit contains a sterile catheter, disposable container, and sterile gloves
Procedure
-
Confirm the client's ID using two client identifiers according to your facility's policy.
Rationale: Checking identification ensures client safety through concept of correct procedure for correct client.
-
Explain the procedure to the client even if the client is unresponsive. Inform the client that suctioning may stimulate transient coughing or gagging, but explain that coughing helps to mobilize secretions. If the client has been suctioned before, just summarize the reasons for the procedure. Reassure the client throughout the procedure.
Rationale: Explanation minimizes anxiety and fear, which can increase oxygen consumption.
-
Wash your hands.
Rationale: Handwashing reduces transfer of microorganisms.
- Gather and place the suction equipment on the client's overbed table or bedside stand. Position the table or stand on your preferred side of the bed to facilitate suctioning. Connect the tubing to the suctioning unit. Date and open the bottle of normal saline solution. Open the waterproof trash bag.
-
Don personal protective equipment, as appropriate.
Rationale: Protective equipment protects you from contact with secretions.
-
Turn on the suction from the wall or portable unit and set the pressure according to your facility's policy (Fig. 1). The pressure may be set between 100 and 150 mm Hg. Occlude the end of the connecting tubing to check suction pressure.
Rationale: Tube occlusion tests suction apparatus; higher pressures cause excessive trauma without enhancing secretion removal.
-
Place the client in semi-Fowler's or high-Fowler's position, if tolerated, to promote lung expansion and effective coughing. If the client is unconscious, position the client on his side facing you to help promote drainage of secretions.
Rationale: Side placement promotes forward drainage of secretions.
-
Place a towel across the client's chest.
Rationale: Towel prevents contact with secretions.
- Using strict aseptic technique, open the suction catheter kit or the packages containing the sterile catheter, container, and gloves. Don the gloves; consider your dominant hand sterile and your nondominant hand nonsterile. Using your nondominant hand, pour the saline solution into the sterile container.
- Pick up the catheter with your dominant (sterile) hand and attach it to the connecting tubing (Fig. 2). Use your nondominant hand to control the suction valve while your dominant hand manipulates the catheter.
-
Lubricate 3" to 4" of the catheter tip with irrigating solution (Fig. 3).
Rationale: Lubrication prevents mucosal trauma when catheter is inserted.
-
Instruct the client to cough and breathe slowly and deeply several times before beginning suction. (See Tips on Airway Clearance.)
Rationale: Coughing helps loosen secretions and may decrease amount of suction necessary, while deep breathing helps minimize or prevent hypoxia.
- Raise the tip of the client's nose with your nondominant hand to straighten the passageway and facilitate insertion of the catheter. Without applying suction, gently insert the suction catheter into the client's nares. Roll the catheter between your fingers to help it advance through the turbinates (Fig. 4). Continue to advance the catheter, approximately 5" to 6" (12.7 to 15 cm), until you reach the pool of secretions or the client begins to cough.
-
Using intermittent suction, withdraw the catheter from the nose with a continuous rotating motion to minimize invagination of the mucosa into the catheter's tip and side ports (Fig. 5).
Rationale: Apply suction for only 10 to 15 seconds at a time to minimize tissue trauma.
- Between passes, wrap the catheter around your dominant (sterile) hand to prevent contamination and clear the lumen of the catheter by dipping it in water and applying suction (Fig. 6).
-
Repeat the procedure, up to 3 times, until gurgling or bubbling sounds stop and respirations are quiet.
Rationale: Allow 30 seconds to 1 minute to allow reoxygenation and reventilation.
- If the client has no history of nasal problems, alternate suctioning between nostrils to minimize traumatic injury. If repeated nasopharyngeal suctioning is required, the use of a nasopharyngeal or oropharyngeal airway will help with catheter insertion, reduce traumatic injury, and promote a patent airway.
-
After completing suctioning, pull your sterile glove off over the coiled catheter and discard it and the nonsterile glove along with the container of water.
Rationale: Glove removal reduces transfer of microorganisms.
- Flush the connecting tubing with normal saline solution.
-
Discard the used items and replace with new supplies so they will be ready for the next suctioning.
Rationale: Having the supplies at the bedside facilitates a quick response.
-
Remove personal protective equipment and wash your hands.
Rationale: Handwashing reduces transfer of microorganisms.
- Let the client rest after suctioning while continuing to observe. The frequency and duration of suctioning depend on the client's tolerance for the procedure and on any complications.
- Record the date, time, reason for suctioning, and technique used; amount, color, consistency, and odor (if any) of the secretions; the client's respiratory status before and after the procedure; any complications and the nursing action taken; and the client's tolerance for the procedure.

Fig. 1: Adjust wall suction.

Fig. 2: Connect the catheter to the tubing.
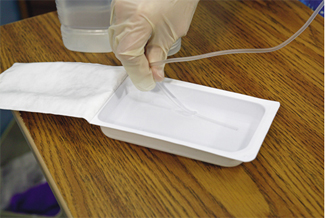
Fig. 3: Dip the catheter into sterile saline.

Fig. 4: Insert catheter into nares.

Fig. 5: Suction the nasopharynx.
Fig. 6: Rinse catheter.
| Sample Documentation | |||
| 03/12/10 | 1400 | Client with a nonproductive cough respiratory rate 30 breaths/min. Suctioned twice for thick, cream-colored secretions from the left and right nares. Postprocedure respirations are nonlabored at 24 breaths/min. Oxygen remains on at 4-L NC. S. Roberts, RN | |
Lifespan Considerations
- For infants, use a 5-Fr to 6-Fr catheter
- For children, use a 6-Fr to 10-Fr catheter
Home Care Considerations
- Nasopharyngeal suctioning may be performed in the home using a portable suction machine. Under these circumstances, suctioning is a clean rather than a sterile procedure. Properly cleaned catheters can be reused, putting less financial strain on clients.
- Catheters should be cleaned by first washing them in water with a detergent, followed by a 60-minute soak in solution of vinegar and water with an acetic acid content of 1.25% or greater, quaternary ammonium compound, or glutaraldehyde or by boiling, when possible. The catheters should then be rinsed with normal saline solution or tap water.
- Whether the client requires disposable or reusable suction equipment, make sure that the client and the caregivers have received proper teaching and support.
| TIPS ON AIRWAY CLEARANCE |
|
Deep breathing and coughing are vital for removing secretions from the lungs. Other techniques used to help clear the airways include diaphragmatic breathing and forced expiration. Here is how to teach these techniques to your clients.
Diaphragmatic breathing First, tell the client to lie supine, with his head elevated 15 to 20 degrees on a pillow. Tell the client to place one hand on the abdomen and then inhale so the abdomen rises. Explain that this technique is known as "breathing with the diaphragm." Next, instruct the client to exhale slowly through the nose-or, even better, through pursed lips-while letting the abdomen collapse. Explain that this action decreases his respiratory rate and increases the tidal volume. Suggest that the client perform this exercise for 30 minutes several times a day. After the client becomes accustomed to the position and has learned to breathe using the diaphragm, abdominal weights of 8.8 to 11 lb (4 to 5 kg) may be applied. The weights enhance the movement of the diaphragm toward the head during expiration. To enhance the effectiveness of exercise, the client may also manually compress the lower costal margins, perform straight-leg lifts, and coordinate the breathing technique with a physical activity, such as walking. Forced expiration Explain to the client that forced expiration (also known as huff coughing) helps clear secretions while causing less traumatic injury than a cough. To perform the technique, tell the client to forcefully expire without closing the glottis, starting with a middle to low lung volume. Tell the client to follow this expiration with a period of diaphragmatic breathing and relaxation. Inform the client that, if the secretions are in the central airways, a more forceful expiration or a cough may be needed to clear them. |